Monday, December 19, 2016

Happy Holidays!

It's always fun to tie learning activities in with big events on the calendar, and the winter holiday season is no exception. Here are some websites with digital learning activities and lesson plans for the holidays. Check them out!


Thank you for all the good work you do for our students. You really make a difference in their lives!

Have a wonderful holiday season! Enjoy time with friends and family!

Thursday, December 8, 2016

New Seesaw Tools!

Last week Seesaw upgraded its App to include two new great tools:

Labels: You and your students can use this tool to add labels to drawings and pictures. You can even move these labels as you record yourself explaining your drawing and pictures.

Pointer: When recording, students can use this pointer to follow their finger as they point to things on their photo or drawing. For example, students can point to the words as they read their writing to you.

See this tutorial and this guide to learn more about how to use these new tools with your students.


Expanding Your Colors!

Are you bored with the limited options for font and object colors in Google Apps?
There are some simple but great extensions that help you pick colors from the web to customize your project's color palette.


1. ColorPick Eyedropper and Eye Dropper are both great options to grab colors from the web to use in your Google Docs and Slides. You don't need both; pick your favorite one to use! Click here for a 2 minute tutorial.

2. Palette Creator: Do you have a hard time picking colors that go together to form a color palette or theme for your project? Once you add this extension, you can right click on any image on the web to get suggested colors and codes. Click here for a 2 minute tutorial.


Sunday, November 27, 2016

New Version of Google Sites

New Google Sites:

Google has rolled out a new version of its website creation tool--Google Sites. While additional features are still being developed, the new version already features a modern interface with drag and drop editing and responsive design that automatically reformats content to fit the device that is being used. This is great if users will be viewing your site on a tablet or phone.

Benefits to having students create their own web sites:

  • increased student engagement.
  • use of higher order thinking skills.
  • authentic demonstration of learning. 
  • student voice and choice.
  • creation of a positive digital footprint.
  • development of 21st century skills (communication, collaboration, creativity and critical thinking). 

Privacy settings:

You can choose to have your sites visible publically or just within your school's domain. Either way, this is a chance for your students to have a wider, authentic audience for their work.

Resources:


Tuesday, November 15, 2016

Using Digital Timers in the Classroom

Using timers can help us and our students manage our time during the lesson and learning activities. They can also help gamify the learning activities to keep our students motivated. 

This article includes several great ideas for using timers to focus and motivate students of all ages:

HOW TO USE A TIMER IN THE CLASSROOM
http://eflmagazine.com/use-timer-classroom/

Here are some quick and fun options for digital timers:

Google Timer
Open Google and type timer plus the number of minutes in the search box.


YouTube
Search for and play a YouTube video that acts as a countdown clock.


Option: Insert Timer into Google Slides

      Play video within Slides


For Even More Timer Options . . . . 
http://www.online-stopwatch.com/classroom-timers/


 . . . and you can Google for even more options!


Sunday, November 6, 2016

Digital Citizenship

Since it is election week, it is fitting to address the topic of citizenship and, in this case, digital citizenship.  

The qualities of being a good digital citizen are very much like the qualities of being a good citizen in general. 

This infographic and publication from ISTE does a great job comparing general citizenship to digital citizenship. The full publication provides deeper insight into each element.

In the spirit of election week, let's commit ourselves to helping our students to become better digital citizens!

Sunday, October 30, 2016

Creating and Using Word Clouds


You and your students can create Word Clouds to quickly create visual representations of text. For example, this Word Cloud was created from the Digital Learning Team's Mission/Vision Statement. 


Ideas for Using Word Clouds

Evaluate Own Writing

Along with the visual cloud that illustrates the prominence of words that appear most frequently, the generators also provide a table indicating word counts. Students can generate a Word Cloud to see which words they are using most frequently in their constructed response or essay in Google Docs or responses to a discussion in Schoology. This can help them assess the variety of their word choices as well as their focus on the topic. 

Analyze Bias/Perspective in Other's Writings

Word Clouds are also a great way to analyze text for bias and perspective. For example, students can create a Word Cloud from three different news sources on the same news event to compare and contrast the stories for bias. This would also work for analyzing presidential candidates' speeches. As a teacher, you can use it to copy/paste student feedback comments from a class survey to quickly assess student mood/tone in your classroom.

Illustrate Text

Word Clouds also make great visual aids to add as images in documents and presentations for student projects and teacher instructional materials.

For more integration ideas 

170  Ways to Use Word Clouds in Every Classroom – by Michael Gorman
1000 Ideas About Word Clouds
- Pinterest

Options for Creating Word Clouds

Option 1: Google Doc Add-On

In Google Docs, you can install and use the Word Cloud Generator Add On (see 1 min. video).
Note: See this 2 minute tutorial video for how to install Add-Ons.


Option 2: Word Cloud Generator App (website)

On the Chromebook or in the Chrome browser, you can install and use the App to create Word Clouds from websites, Google Docs and most PDF files.
Note: See this 2 minute tutorial video for how to install Chrome Apps.


Option 3: Tagul Website

The Tagul Website is another great source for creating Word Clouds that allows you to create much more visually attractive illustrations. See this video to learn how to create Word Clouds using this site.


Monday, October 24, 2016

Image Editing


Images add an element of interest to almost anything we create, but sometimes, the images we find are not quite right. Below are a couple image editing tools you can use to crop, filter, resize, etc.

Pixlr Editor  (https://pixlr.com/editor/
  • This free online photo editor offers editing tools similar to Photoshop. It works great on a Chromebook too.
  • Features range from simple cropping and sharpening to creating composite images, adding layers, combining several images, adding text, digital painting, etc.


Pixlr Express  (https://pixlr.com/express/)

  • This is another free Pixlr product, but this one allows you to create simple collages of images. This works great on the Chromebook as well.
  • Choose a layout, add images, adjust and create!


Google Slides & Docs
  • Google Slides and Docs offers some nice built-in photo editing options.
  • Toolbar options allow you to crop and rotate.
  • Click the image options button to recolor and adjust transparency, brightness and contrast.

Bonus: a simple way to add text to an image
  • Add an image to a Google Slide.
  • Add a textbook over the image.

  • Take a screenshot of your new image.
    1. Mac: Command + Shift + 4 
    2. PC: Snipping Tool
    3. Chromebook: Control + Shift + Switch Window Button


Sunday, October 9, 2016

New Name: Google Apps is Now G Suite

Last week Google renamed its Google Apps for Education to G Suite for Education. Their core services remain the same; the new name is intended to better reflect their mission.

"G Suite for Education is the same set of apps that you know and love—Gmail, Docs, Drive, Calendar, Hangouts, and more— but designed with new intelligent features that make work easier and bring teachers and students together. Because we believe that when students and teachers break down silos and have collaborative tools for their classroom, amazing learning can happen." (Source: Google Blog)


The new name does come with a few new great features:

1. G Suite Training button
You will now see this new question mark in the upper right corner of your G Suite Apps. It's your personal trainer for the various Apps. You can click it at anytime to see quick tutorials on how to use the tools.


2. Natural Language Processing
You can now search your Drive "like you talk." For example, you can type "Show me slides Paul shared with me in October." You can click the suggestion to see those files.


3. Explore button
This feature was highlighted in last week's tech tip. You will see this new button in the lower right corner of Docs, Sheets and Slides. You can click this button to research the web and add content to Docs, quickly and easily design Slides, and analyze data in Sheets.


Sunday, October 2, 2016

New "Explore" feature in Google Docs, Sheets and Slides

Google has added a new feature to Docs, Sheets and Slides to help users manipulate their documents more quickly and easily. In each of these three programs, simply click the "Explore" button to launch the Explore panel.

The Google Docs Blog states: "It's like having a researcher, analyst and designer by your side."

Docs--"Researcher"
Get quick access to search the web, find images and even locate files in your Drive.


Slides--"Designer"
Get design suggestions based on your content. Simply choose and apply a suggested format.


Sheets--"Analyst"
Get quick access to formatting templates, ask a data question and get formula suggestions.


Thursday, September 29, 2016

Checking Parent Enrollments in Schoology and Seesaw

Follow the directions below to see how many and which parents have set up Schoology and/or Seesaw accounts for your students and classes.

SCHOOLOGY

Click COURSE OPTIONS and select VIEW COURSE AS (under your course logo).


​​
Click PARENTS(Note: The parents option will appear once you have one parent activated).

SEESAW
Click MANAGE CLASS in the menu list

Scroll down to locate and click MANAGE PARENTS
See list of students with CONNECTED PARENTS (and not connected)

Wednesday, September 28, 2016

Extensis Fonts Add-On for Google

If you are looking for more font styles, there is a Google Docs Add-On you can install called Extensis FontsIt gives you access to hundreds more font styles. 

To Install Extensis (only need to be done once), 
1. click ADD-ONS on the main menu
2. select "Manage Add-Ons" (last item on list)
3. Search for Extensis Fonts
4. Click Install

To run Extensis,
1. Click ADD -ONS
2. Click Extensis Fonts
3. Click Start
4. Highlight text and click font style listed in the Extensis panel.


Tuesday, September 27, 2016

Google Docs Tips: Fillable Forms, Columns, Font Styles, Snapshots


Tip 1: Use columns (feature recently added!)

Click Format and select Columns


Tip 2:  Change your font styles
(100+ font styles available--set your favorites)

Step 1: Click drop arrow by font styles.
Step 2: Click More Fonts
Step 3: Select the styles you want to appear in your styles drop list

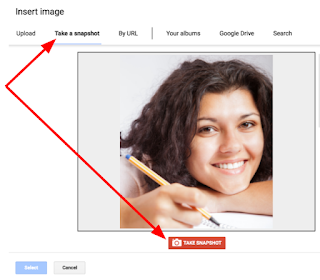
Tip 3: Insert Snapshots

Step 1: Click Insert -- Image from the main menu
Step 2: Select "Take a Snapshot" 

Bonus Tip: You Drag and drop images right from your desktop


Tip 4: Create fillable forms

To avoid this situation when someone fills out your Google document:
BEFORE: Name: ________
AFTER: Name: _____ Jon Doe__________

Use tables instead to create fillable text fields:
Step 1: Click Table from the main menu and select rows and columns needed

Name:


Step 2: Make some borders invisible by setting their cell's border width to 0.

Name:
           Jon Doe


Click here to see detailed steps.


Wednesday, September 21, 2016

Turning notifications on/off in Seesaw and Schoology

By default, Seesaw and Schoology send you email notifications when specific actions occur (like posting an update, adding a new member to a course, etc.). You can customize what notifications you receive.

In Schoology, there are two ways to do this:

1. Edit settings for an individual course

  • Open the course
  • Click notifications button in the top right
  • Toggle on/off the notifications (checked = you will get an email notification)

2. Edit settings for multiple courses at once (& for text message options)
  • Click the dropdown arrow by your name in the top right corner
  • Select Notifications

  • Select On, Off or Custom for each setting. Custom allows you to select the on/off setting for each course.
  • Be sure to SAVE at the bottom!


Here is a tutorial video to review: Edit Notification Settings (email and text messages)

In Seesaw:
  • Open Seesaw
  • Click your image/name in the top left to see your menus.
  • Click the Gear icon.
  • Choose "Account Settings."
  • Toggle the notification settings on/off as desired (green = on).


Saturday, September 17, 2016

Permission Settings for Google Docs Shared with Parents

When you link/embed Google Docs/Slides/Sheets in Schoology or Seesaw for parents to read, you will need to change your Share permissions on those files (otherwise the parents will get the below error message).


Here's how to change those permissions:
1. Click SHARE button


2. Click Advanced


3. Click Change


4. Select "On-Anyone with the Link" 
5. Select "Can View"
6. Click SAVE